Greetings, fellow coders and game designers! Today’s topic is how we can build a Unity AI inside a game by using visual scripting systems.
This post is an introduction, so we’ll keep things simple. We’ll compare two powerful tools: Playmaker and Behavior Designer (follow the links for their full reviews). For Pathfinding both of them use Unity NavMesh Agents, but the same approach applies for specialized assets like A* Pathfinding or Apex Path (you can see a comparison between those three pathfinding options here). Both Playmaker and Behavior Designer are excellent in their own right, but they differ from each other in several important aspects when applied to behaviors.
For the sake of simplicity, I’ll assume you are at least somewhat familiar with Unity, and that you know what Unity Assets are. We’ll start with the core concepts and afterwords compare the workflow in the two visual scripting tools.
AI in the Context of Gaming
When we talk about artificial intelligence in gaming, we don’t mean machines simulating human thought processes. The fields of machine learning and deep learning are profoundly interesting, but their theory and implementation remain on the cutting edge of academic research. It would be extraordinarily difficult to implement anything like Apple’s Siri or Amazon’s Alexa inside a game – and it would also be a complete waste of time.
But if that is the case, how do we create an intelligence inside a game? Well, we are game developers – so we cheat! 🙂
We don’t really need our non-player characters and units to “think” – we only need them to act as if they were thinking. By game AI we generally mean computational behavior, or the simulation of a specific purposeful activity. Put simply, we are interested only in the appearance of intellect. If it looks like a duck and quacks like a duck, then good job, fella, that’s a nice duck AI right there! 😛
Tools for AI Behavior: FSM vs Behavior Tree
Let’s outline a simple game example. Imagine a survival game where the player is walking in the forest and meets a wolf. How do we make the behavior of the wolf believable?
The classic approach in visual programming is to define states and transition between them when certain criteria are met. This model of computation is called a Finite State Machine (FSM) and is employed by popular Unity assets like Playmaker. Of course, FSMs are used not only to guide behaviors, but for general visual scripting. The beauty of this model is its simplicity and reliability: you always know what state the character is in. You can confidently use FSMs for simple interactions, but they tend to become unmanageable monsters in situations of high complexity.
A more advanced approach is to use behavior trees. This model is implemented by the Behavior Designer Unity asset (among others). Behavior trees are very similar to FSMs, but they use “tasks” instead of “states”. This approach has several advantages including more power (you can update a tree more easily than an FSM) and greater flexibility, e.g. your units can execute multiple tasks in parallel at the same time. Generally, you can use FSMs to create simple behaviors, but if your game AI is going to be complex, a behavior tree would save you a lot of hair-pulling later on.
Let’s map out the behavior of our wolf.
Making a simple FSM in Playmaker
Tip: when dealing with behavior, start by defining the most fundamental states and gradually build up the complexity.
In this case we only need two core states: Stalking and Attack. In Stalking, the wolf would wait close to the path. If the player enters into a predefined range, the wolf will transition to the Attack state. In practice, it is a piece of pie to implement this in Playmaker (although you could also write your own script and continuously check the distance between the positions of the wolf and the player in the Update function or better yet, inside a Coroutine).
Now, in the Attack state the wolf will go to the position of the player. The player can still escape if he exits the range of the wolf; if that happens, the wolf would go to the location of the last sighting and transition back to the Stalking state. And there you have it – a simple wolf behavior at a glance.
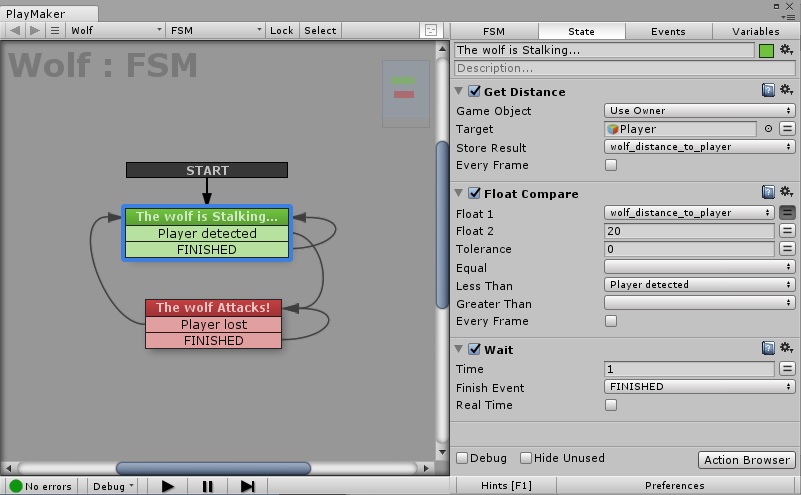
How does this look in Playmaker? Here is a screenshot of the Wolf FSM:
The Wolf FSM Explained
In the Stalking state we have 3 actions: Get Distance, Float Compare and Wait. This sequence determines whether the player is in the Wolf’s range (set here to 20). If the player is closer than 20, the FSM transitions to the Attack state, where the wolf would go to the player’s position (and presumably do damage). We are only looking at the behavior logic here, so we won’t be covering the pathfinding actions inside the Attack state. Let’s just say that you can use either Playmaker’s additional NavMesh actions (which implement Unity’s NavMesh and are available here), or the actions from your favorite Pathfinding tool like A* Pathfinding or Apex Path (Playmaker supports both of them).
Side note: while in the Stalking state, we could also check for a clear line of sight by ray-casting between the player and the wolf’s positions. However, a game designer should always try to think in the context of the game’s environment and avoid extra developing efforts. In this case, wouldn’t the wolf smell the player even without a clear line of sight? Just play the audio of a low creepy growl when the wolf detects the player (and if making a Fantasy, add a grinning, hungry “Ahrrr, I smell you-u…”). This would alert the player to the danger, make the game experience more immersive and – always fun – scare the bejesus out of him. Bottom line: think logically and try to add value, not complexity.
OK, so very easy stuff, right? Now let’s implement a behavior tree to make the wolf a bit more capable.
Creating complex behavior with Behavior Designer
Behavior Designer is a user-friendly and pretty powerful AI tool for Unity 3D. You can find a complete review of it here.
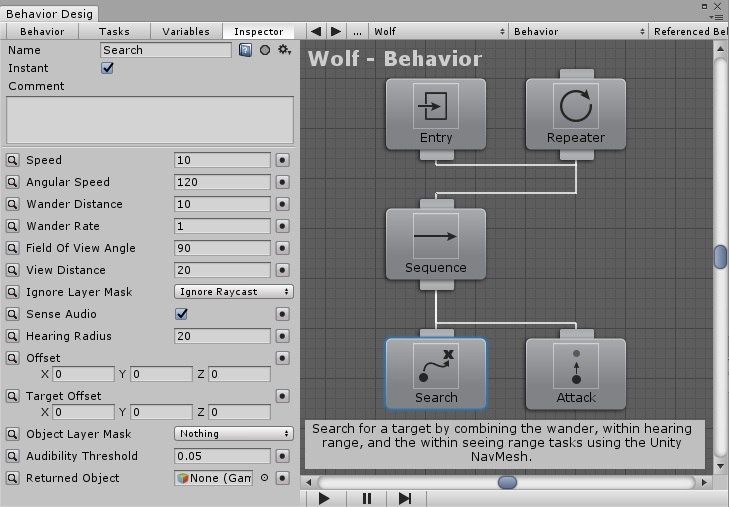
First, we add a Repeater task, which will keep executing the child tasks. Next, we add a Sequence, which runs its child tasks sequentially until one of them returns failure. The child tasks are Search and Attack. In Search the wolf will wonder around the forest, looking for the player. Once the player is seen or heard within the specified range, the Attack task be executed.
You can see how straight-forward the implementation is when using behavior trees. To make things even easier, Behavior Designer has 3 additional packs available: Movement, Tactical and Formations. In this particular tree, the Search task is part of Movement, and Attack is part of the Tactical pack. Their use is extremely simple – just connect them to the tree and tweak their parameters to your liking. By default, Behavior Designer uses Unity’s NavMesh Agent, but it also supports Unity’s more powerful navigation assets like A* Pathfinding and Apex Path.
With this example we conclude our Unity Game AI introduction. If you have never tried the tools above and feel a bit overwhelmed, don’t worry! All you need is to play around with Playmaker or Behavior Designer for a couple for hours and you will feel much more confident.
But be careful: if you somehow manage to create a functioning conscious artificial general intelligence, please make it more like WALL-E and less like Skynet ;). Good luck!


